|
 |
 |
 |
 |
 |
 |
 |
|
|
|
|
|
|
|
|
by Kyle Luckenbill & Mark Sabaj
|
When imaging specimens it is often difficult to get that perfect picture, especially when photographing specimens immersed in water in a glass photo tank. Below are detailed instructions on how we use Adobe Photoshop to improve the quality of digital images. In this example, the specimen was positioned in a glass “squeeze” tank filled with distilled water and photographed against a black background (the background color that is most easy to work with). Using a pressure sensitive drawing tablet is recommended, but a mouse will work just as well. If you have any trouble interpreting these instructions, please let us know by email (luckenbill@acnatsci.org or sabaj@acnatsci.org). |
|
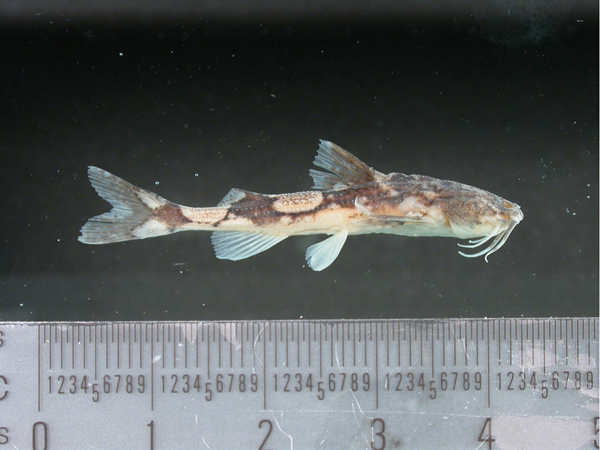
Open your image in Photoshop (Fig. 1).
|
|
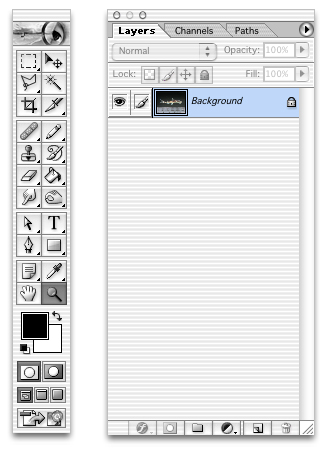
On the Photoshop menu bar at the top of your screen click on "Windows" and select "Tools" and "Layers" to display these palettes. |
|
|
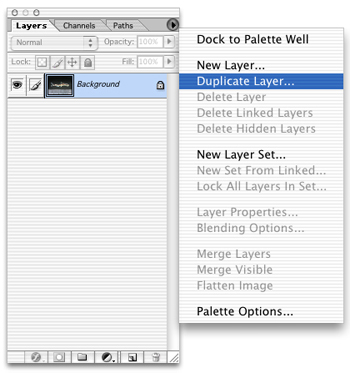
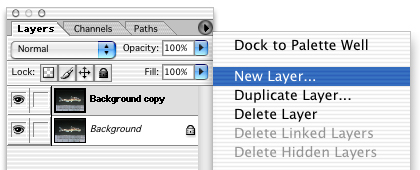
First, copy the background layer by clicking on the arrow at the top right corner of the Layers palette and choosing "Duplicate Layer...". A Background copy will appear in the Layers palette.
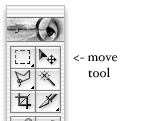
Then go to the main menu bar at the top of your screen, click on "Edit" and select "Free - Transform". A box will appear around the specimen image. To rotate the image, drag your cursor to one of the corners until you see a curved line with an arrow on each end. Then click, hold and move your mouse to rotate the image. When you are satisified, simply release the mouse button. Note: make sure you are only rotating the image and not changing its width or height. Click on the move tool again and "Apply" transformation. |
|
|
The next step is to add a scale. First make a new layer (blank). Click on the arrow at the top right corner of the Layers palette and select "New Layer". |
|
|
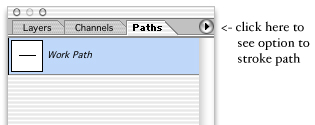
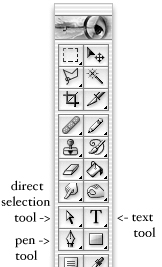
Now, select the pen tool from the Tools palette. Make a point by clicking your mouse at the start of the scale. Then hold the shift key and click the mouse again at the end of the scale (holding shift key gives you a perfectly straight path). You do not have a line yet. What you have drawn is a path. To produce a line you must stroke the path. Before this, you may wish to re-position the path. To do this click on the direct selection tool on the Tool palette, then click on the path and move it to where you want the line to be. Now select the "Paths" tag on the Layers palette.
Now click on the brush (or pencil) in the Tool palette and select a brush size (4 or 5 usually works fine). The color of your path will be the one displayed in the foreground color box towards the bottom left of your Tools palette. Double click on this box to see options for changing this color. After you have selected a brush size and a color, make sure that your "Work Path" layer is highlighted (as shown above in blue). If it is not, then click on "Work Path". Then click on the little arrow at the upper right corner of the Layers palette and choose "Stroke Path". After you stroke the path, the line becomes part of the new layer that you created (separate from the layer with the image of your fish). If you have this layer selected, you can reposition the line simply by dragging your mouse. Use the Text tool to describe your scale (e.g., 1 cm). Notice that this also creates a new layer in your Layers palette. When you have the text layer selected, you can reposition the text simply by dragging your mouse. |
|
|
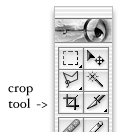
After adding the scale you can now crop the iamge. Select the crop tool on the Tools palette, make a frame around the portion of the picture that you wish to save, and then crop it . |
|
|
The specimen image will often have bubbles, floating debris, reflections, unwanted shadows and other inconsistencies in the background. |
|
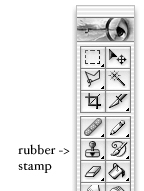
One way to remove unwanted elements from the background is to use the rubber stamp tool. After you select the rubber stamp, you can adjust the brush size and shape using the options bar below the main menu (as seen below). |
 |

|
To use the rubber stamp, first place the cursor (usually appears as circle) on the specimen image in the place that you want to copy (select area). Then press the "alt Option" key on your keyboard (the circle becomes target symbol) and press your mouse button. Release the mouse button and move the cursor (now a circle again) to the place that you want to cover up or fix (target area). Press the mouse button again to cover up the target area with the selected area. This is a fast and easy way to cover up small inconsistencies in the background (e.g., air bubbles). However using the rubber stamp is time consuming if you have large areas of the background to repair. We describe another option below. |
|
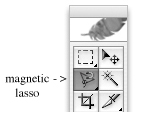
Select the magnetic lasso tool from the Tools palette. Move the cursor arrow onto your image and click near the edge of the specimen. Now slowley drag the cursor around the specimen, the lasso should be snapping to the edge of the specimen. When you get all the way around to the where you started go to the first point you made and click a second time (Fig. 2). This will complete the selection and you should see a moving dotted line around the specimen (Fig. 3). |
|

Fig. 2
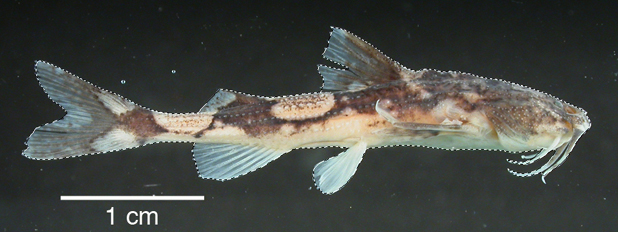
Fig. 3
|
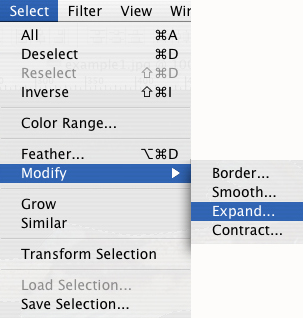
The next step is to expand the selection. Go to the top menu bar and click on Select and then modify and select Expand (right). This will bring up a small menu (lower right). Enter a number between 5 and 10 and click okay. This will expand your entire selecion by the number of pixels you entered. Next invert your selection by going back to the top menu bar and clicking on Select and then Inverse (right). You should now have the background selected. When you are finished your selection should look like Fig. 4. |
|
 |
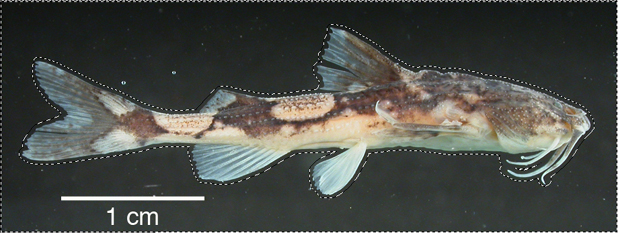
Fig. 4
|
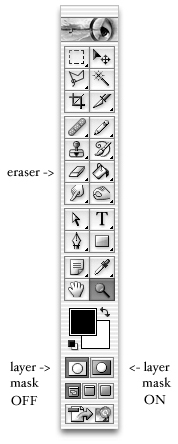
Next turn on the layer mask. Click on the shaded square with the white circle - this icon is towards the bottom right corner of the Tools palette. You will see a transparent red layer over the specimen and anything else in your image that was not selected earlier by the magic wand. Now select the eraser in the Tools palette. Using the menu bar, adjust the eraser brush size (36 or smaller works best for images 2272 by 1704 pixels at 300 dpi) and make sure the hardness (opacity) is set to 100%. Use the eraser to get rid of any red that may be overlapping the specimen (the transparent red mask layer should get bigger). After you go around the entire specimen (every part of the specimen is within the transparent red mask layer), then turn off the layer mask by clicking on the icon towards the bottom left corner of the Tools palette. Notice that the area selected by your magic wand (i.e., the area within the moving dotted lines) has become smaller. When you are finished it should look like Fig. 5. |
|
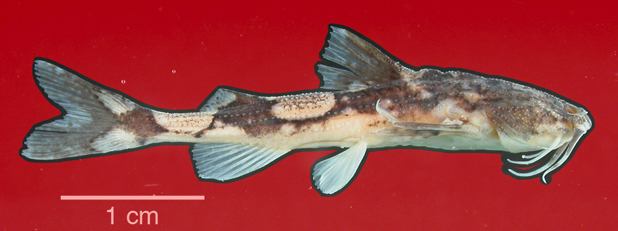
Fig. 5
|
First make a new layer (blank). Click on the arrow at the top right corner of the Layers palette and select "New Layer". A new "Layer 1" will appear above the Background copy layer. |
|
|
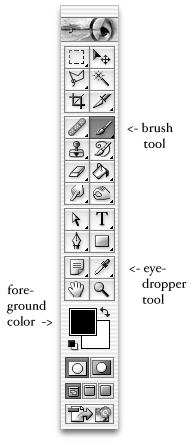
Next choose the color of your background. If you used a black backgound, click on the foreground color square towards the bottom of the Tool palette and set it to black (as it is in Tool palette dispayed on the right). If you used a different background color, click on the eyedropper tool. Then move your cursor to a place on the background of your image and click. The color displayed in the foreground color square will change to the color that you selected with the eyedropper. Move the eyedropper cursor to a different spot on the background and click to "capture" a different shade of your background color. Note: the color displayed in the foreground color square will become the standardized background of your specimen image. Now go to the top menu bar and click on edit and and select fill. A menu will come up asking you to select a fill. Select foreground and click okay. When you are done it should look like Fig. 6. |
|
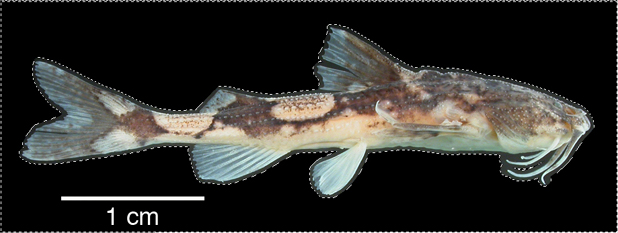
Fig. 6. Image after background painting.
|
Now you are ready to fill in the background around your specimen. This takes a little time and patience (but it can be relaxing). First turn on the Background copy by clicking in the box to the far left of the Background copy image in the Layers palette (eye will appear in box). Now make sure that Layer 1 is selected (e.g., highlighted in blue). Click on Layer 1 if it is not. This is the layer that you will be working on. |
|
|
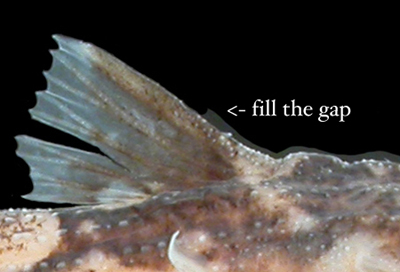
Next zoom in on the specimen using the magnifying tool (bottom right of Tool palette). Then click on the brush tool (it is in the same place as the pencil tool; if pencil is showing, hold option key and click to change it to brush). Adjust the brush size to suit your needs (5-10 works well) and make sure the opacity is set to 100%. Now paint around the specimen, filling the gap between it and the background (Fig. 5). You should notice a thin black line (i.e., dark halo) around the outer edge of the specimen (this only occurs when the specimen is photographed against a black background). The dark halo makes it easy to fill in the gap without covering up any of the specimen and it gives you a softer looking edge. |
|
|
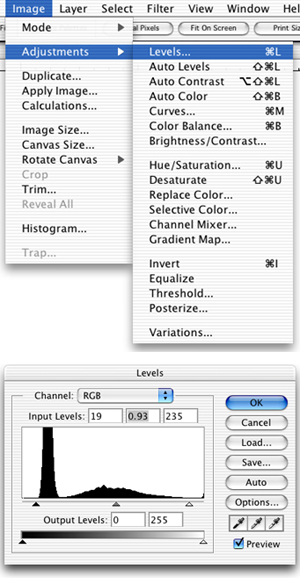
Now that you have removed distracting elements from the background, it is time to focus on the appearence of the specimen. As a general rule, we make only small subtle adjustments to enhance the original appearance of the imaged specimen. First make sure that you have the Background copy layer selected (highlighted in blue) in the Layers palette. Now click "Image" on the main menu bar - then "Adjustments" and "Levels"... A histogram with 3 small arrows (black, gray and white) will appear. You can use the arrows to adjust the look of the image. We generally move the black and white arrows in towards the start of the histogram. Then try moving the gray arrow to achieve the look you desire. When you are satisfied click OK. You can also try adjusting the Brightness/Contrast and Color (under main menu bar "Image" - "Adjustments"). Some people like to select "Auto Levels", "Auto Contrast" or "Auto Color" to correct images. The "Auto" changes to your image may be too severe (especially with respect to color). If you do select an "Auto" option and the change is too great; go to "Edit" on the main menu and select "Fade Auto Levels". Here you are given the opportunity to adjust the degree of change effected by your specific "Auto" option. |
|
|
Other useful tools for improving images are the "dodge" and "burn" on the Tools palette (click on tool displayed and press option key to change to other tool). Painting over an area with the dodge tool will make it lighter. You can choose whether to lighten highlights, midtones, or shadows using the "Range" option (next to brush size on main menu bar). You can also adjust the "Exposure". A low exposure (5 to 10%) works best because you can lighten the areas gradually. Painting over an area with the burn tool will make it darker. The burn tool can be adjusted like the dodge tool. Set burn tool Range to Highlights to darken areas that are very bright (e.g., light reflecting off wet specimens photographed in air). Set burn tool Range to Shadows to darken areas such as the membranes between fin rays (this to help the membranes better match the black background). The final adjustment you may want to try is Sharpness. Go to the main menu bar at the top of the screen and select Filter – Sharpen – Unsharp Mask. This lets you adjust how sharp you want the pixels to look (we recommend keeping this adjustment near 50% and below 100%). |
|
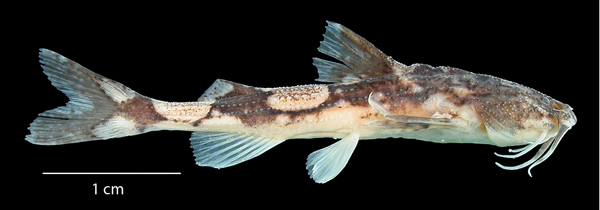
Fig. 7. Finished image
|
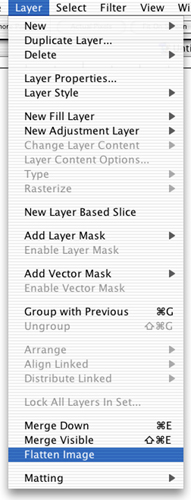
We recommend saving 2 copies of your finished image: Remember that your finished image is made up of multiple layers (one for text, one for cleaned background, one background, and one background copy). To preserve these separate layers you must save this image as a Photoshop file (.psd). This will give you the opportunity to modify the layers after you save (e.g., change the color of the background). You also should save the finished image as a "flat" JPEG or TIFF file. To flatten the layers, go to Layer in the main menu and click "Flatten Image". Now your image is restricted to a single layer (the background). Flat images are more utilitarian (e.g., they can be imported into Powerpoint presentations or pasted into emails). When uploading images to ACSImagebase, please upload only flat JPEG or TIFF files with the appropriate extension (.jpg or .tif). When naming your images, try to include the museum and catalog number (for tips on naming and storing metadata with your images, click here) |
|
|
The undo command is your best friend. However, Photoshop only allows you a few undos. The shortcuts are Apple Z for one undo, Apple Option Z for more undos, and Apple Shift Z to go back (Macintosh) and Control Z, Control Option Z, and Control Shift Z (PC). |
|
1. Guidelines & suggestions for preparing digital images of specimens |
|
2. Tips for taking digital photographs of specimens (e.g., photo tank set up) |